
If you’re considering an EDDM® campaign or have done one in the past, you know there’s a bit of legwork involved. Especially if you choose to handle the bundling and paperwork yourself. To make things easy for you, we’ve put together a few tips to make your EDDM® campaign a little less time-consuming.
1. Make Sure Your Pieces Meet USPS Size Requirements
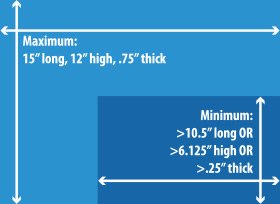
The USPS has specific rules for the dimensions, shape, and thickness of EDDM® mail pieces. If you don’t meet these requirements, you won’t be able to mail your ads via EDDM®. To make sure you don’t waste precious time and money designing and printing pieces that can’t be mailed, familiarize yourself with these regulations beforehand. You can find more information on EDDM® size requirements in this article.
2. Use Templates to Design Your Pieces
Templates help ensure your pieces are compliant with USPS regulations before you put the time and effort into designing your advertisement. They’ll not only keep you within dimension requirements, but also ensure your address panel and indicia (an imprint on each mail piece that signifies the postage has been prepaid) are properly placed.
Many direct mail companies and printers will provide you with free EDDM® design templates if you choose their services, or they’ll design it for you. If you’re doing the design work yourself, just be sure to double check your piece against the USPS’ EDDM® size requirements before printing. See the link above for these specific requirements.
3. Weigh Your EDDM® Bundles
It’s important to know how to bundle EDDM® pieces in order to meet USPS regulations. To start, EDDM® bundles must contain between 50 and 100 mail pieces. Rather than counting out every single one of your bundles, try using a scale. After making sure one bundle meets the requirements above, record its weight. Then, weigh out your remaining bundles and make sure they match the weight of the first bundle.
4. Stack Your EDDM® Bundles
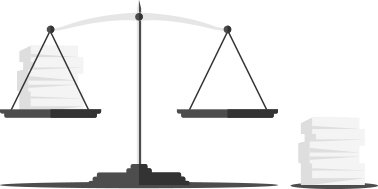
If you don’t have a scale, you can stack your EDDM® bundles and compare them based on height. Keep in mind that your bundles cannot be higher than 6 inches tall. Start by counting out one bundle to ensure it meets USPS regulations. Then, stack the rest of your bundles next to each other. Make sure they’re all the same height as the first bundle to ensure they all contain the same amount of pieces.
5. Photocopy Your EDDM® Facing Slips
USPS EDDM® facing slips tell the USPS how to process and deliver your mail pieces, and you can’t mail without them. Rather than filling out a new facing slip for each bundle on your chosen route, fill out the information that doesn’t change and make copies for your other bundles. If you need to download facing slips for your campaign, the USPS offers EDDM® Retail and EDDM® BMEU versions. Below you’ll find an EDDM® facing slip example.
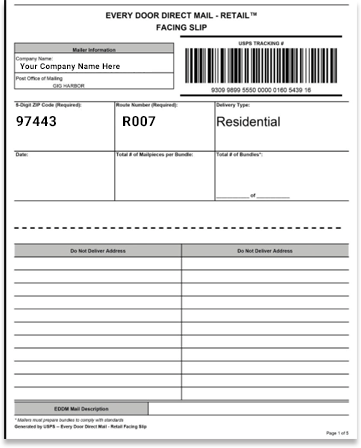
The following information should remain the same for each carrier route:
- Company Name
- Post Office of Mailing
- 5-Digit ZIP Code
- Route Number
- Delivery Type
- Date
However, the information below will change for each slip:
- Total # of Mail Pieces per Bundle (i.e. 50)
- Total # of Bundles (i.e. 2 of 4)
Regardless of whether you’re submitting 5 facing slips or 50, making copies streamlines the process of filling out USPS paperwork.
Conclusion
Executing an EDDM® campaign on your own is time-consuming, but the tips above can help streamline the process. Understanding mail size requirements ensures you design a compliant piece. And taking shortcuts when preparing your bundles and filling out your paperwork saves time. But the best way to save time on your EDDM® campaign is to work with a full-service direct mail company or commercial printer that can handle the bundling and paperwork for you.